MyPostageRateSaver
Question&Answers
Q3 How do I contact the Live Technical Support?
Q4 Program doesn't finish installing
Q5 On Windows XP, my program stalls during installation.
Q7 Where is my program manual?
Q9 How can I export my data for use in another program, or for backup purposes?
Q10 "Access is denied"
Q12 How do I import a data file?
Q13 I have Windows XP, and when I try to use the Help in the program, it doesn't work. What's wrong?
Q14 "Could not find supporting program files to do address correction..."
Q15 I get an error referencing "Clacstmp.dll" or "Clacadv.dll" when I try to use my program
Q3 How do I contact the Live Technical Support?
A3(Answer ID 1497): Please note that we have free support options on our website in the form of Frequently Asked Questions and email support. For free support please submit a question via email at support@mypostageratesaver.com..
Q4 Program doesn't finish installing
A4(Answer ID 1254): Most likely there is a program running in the background of your computer that is preventing you from installing the program properly. Please try the following:
Close all of your programs. Please go to Start | Run.
Type in: MSCONFIG
Press OK.
Make a note of which Startup selection is chosen as you will need to choose this option later.
Now, choose Diagnostic in the General Setup tab. Press Apply and then press Close or OK.
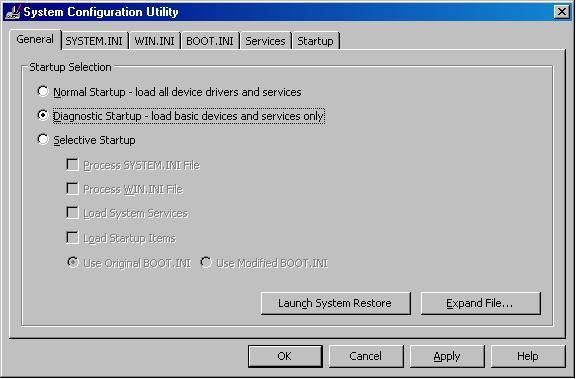
You will then need to restart your computer.
After your computer restarts, you should be able to insert the CD and install the program. Once the program is finished installing, do not restart if prompted. Instead, go to Start | Run.
Type in: MSCONFIG
Choose the Startup selection that you noted before you chose Diagnostic startup. Now restart your computer. The program should work properly for you after restarting.
Q5 On Windows XP, my program stalls during installation.
A5(Answer ID 1269): Typically this has to do with a conflict with another program (or programs) running in the background. Often installing while startup items are turned off using Windows Diagnostic startup allows a full and successful installation. Please try the following:
1) Cancel the installation
2) Go to "Start" | "Run," type msconfig and click OK
3) Make note of the chosen startup - it will be either Normal, Diagnostic, or Selective
4) Choose Diagnostic, click "Apply," (wait for the hourglass to go away, which can take several seconds) and then click "Close," and when prompted to restart, do so
5) After the computer restarts, close both windows that appear regarding Diagnostic mode
6) Install the program
7) If/when prompted to restart after the installation, choose "No"
8) Go to "Start" | "Run," type msconfig and click OK
9) Re-select the startup mode you made note of in step 3, click "Apply" and then click "Close" and when prompted to restart, do so
Q7 Where is my program manual?
A7(Answer ID 1271): Many programs ship with a 1 or 2 page pamphlet called the "Getting Started Quickly" Guide in the program box. This "Getting Started Quickly" Guide is designed to help you install the program from your CD, open the program and then get started using basic functions of the program.
This "Getting Started Quickly" Guide is NOT the "Manual" for the program. Each program comes with an electronic document called a "User's Guide" that is installed along with your program.
After you've followed the instructions in the "Getting Started Quickly" Guide to install your program, you can open the User's Guide on your system by clicking on the START Menu, choosing "Programs", then "MyPostageRateSaver”, then you will see the icons for the program. One icon will be the "launcher" to open the program itself, and other icons will say "User's Guide". Click on the icon for the "User's Guide " to open the manual on your screen.
The User's Guide will open with a program called "Adobe Acrobat Reader" that will be on your system. This is a program that is used to open "PDF" files, which is a file type that many companies use to digitally distribute documents. Our manuals can be viewed with Adobe Acrobat Reader versions 4.0 and higher. If you do not have Adobe Acrobat Reader, please visit the Adobe website at www.adobe.com for a free download of their FREE Acrobat Reader program.
This PDF User Guide file allows you to view and read the manual right on your screen. You can use the Scroll bar on the far right-hand side of the window to scroll through the "pages" of the manual, and use the chapter heading links on the left-hand pane to "quick-jump" to a specific section of the manual.
If you wish to print out a hard copy of the manual, you can do so by choosing the "Print" command in the "File" Menu of Adobe Acrobat Reader. (***PLEASE NOTE*** The manuals for our programs are often between 150-250 pages and will require this many sheets from your printer to print entirely.)
If you cannot open Acrobat Reader because you get an error message you may need to uninstall and reinstall the Acrobat Reader program to get it to work properly. To do this, go to the "START" Menu on your system, and choose the Control Panel (this is under "Settings" unless you have Windows XP). Here, find and double-click on "Add/Remove Programs". This will open a window where you can modify your installed programs - find the option for "Adobe Acrobat Reader" and then click the "Add/Remove" or "Change/Remove" button. Follow the on-screen instructions to remove your installation of Acrobat Reader. When you're done, reboot your system and then reinstall Acrobat Reader by visiting the Adobe website link mentioned above (www.adobe.com) and then browsing to find the free Adobe Acrobat Reader download.
Q9 How can I export my data for use in another program, or for backup purposes?
A9(Answer ID 1082): Your database program can export its data to a text-based file which then can be used to import or directly open into other database or contact management programs. This can also be a way to backup your information in cause of file loss or file corruption.
Here is an overview of how you can make an export:
- Open your list file in your database program
- Go to the File menu and select Export
- On the Export dialog, select the record range you wish to export. To export or backup everything, choose the option All Records
- In the center of the dialog window, click the Add All>> button to tell the program to export data from every field in your database. If you want to export only specific fields instead, highlight the field(s) you want to export in the listing on the left, then click the Add>> button to send them to the export. Click OK when you are done.
- The Save As dialog will open. Choose a Windows location you wish to send this exported file to in the Save In drop-down listing at the top. Then, choose the Export Type from the drop-down listing at the bottom. The default setting is Quote and Comma Separated Variable (*.CSV) and this is a "universal" text-based data file format that almost any database-type program can read and interpret. Use this option if you are not sure what type to export, otherwise, choose any of the other options if you prefer for the export type.
- The last option to confirm is the File Name. The default name is ExpFile, however, you can change this name to anything you wish by typing in a different name.
- Click Save when you are done. The program has now created a separate file with the raw text data from your database in the location you specified with the filename you entered. You can now use this exported file as the file to import in your other program, or simply archive it to protect your information.
A10(Answer ID 1256) This error message is related to the InstallShield application that our program uses to install its files to your computer. To fix this error message, try the following in order:
1) Close all windows, reboot your system and try installing your program again. If you have any programs running at the same time you install your program, this can prevent the installation from loading properly.
2) Close down background tasks. You can do this by hitting the CTRL+ALT+DEL keys all at the same time. This will open your Windows Task Manager where you can shut down any tasks or processes that you are not using at the current time. Sometimes a conflicting program is running in the background that will prevent the program from installing (especially a Task Entry for "ikernel", which means InstallShield is not closing and finishing properly on its own).
3) If you get one of the following error messages on installation:
- Error extracting support files
- Error installing Ikernel.exe (0x any number)
- Access is denied
- Error loading Type Library/DLL
This can represent a problem with the files that make up your InstallShield program. You can "re-build" the InstallShield program by deleting the following folder from your system:
C:\Program Files\Common Files\InstallShield
This can be accessed by double-clicking on the "My Computer" option on your Windows Desktop or in your "START" Menu. Then, double-click on the folder "Program Files". Next, double-click on the folder "Common Files", and in there you will see the "InstallShield" folder. Delete this "InstallShield" folder.
When you're done, close all open windows, reboot your system and try to install your program again.
Q12 How do I import a data file?
A12(Answer ID 1086):
If the data file you want to import is currently open, close it before continuing.
- Open the database that you want to import the list into.
- Open the File menu and choose Import to open the Import dialog.
- Choose the type of program that created the file you want to import from the Files of Type box.
- Locate the drive and folder where the file is saved by clicking in the Look-in drop-down list and choosing the folder.
- Select the file you want to import.
- Click OK (or Open ).
When you import a text file, the Use First Record for Field Names dialog opens.
- If the first line of the file contains field names, such as ?First_Name,Last_Name,Address,?? click Yes. This line is not imported as data.
- If the first line contains data, such as ?Bob,Smith,123 Main St,?? click No. This line is imported as one of your records.
After you click Yes or No, the Assign Import Fields dialog opens. Use this dialog to match the fields from the import file to the fields in your current file.
If the bottom-left dialog box for Fields in Import File is completely empty, then simply click the OK button. If the bottom-left dialog box for Fields in Import File has field name entries in it, you will need to assign those fields to an appropriately-matching field from the bottom-right dialog box for Fields in Current File. Do this by left-clicking to highlight a field entry in Fields in Import File list, then finding its appropriate match and clicking on it in the Fields in Current File listing. When you do this, both entries should disappear from their respective lists and re-appear as a field assignment in the top dialog box (For example, you might need to click on First Name in the Fields in Import File listing and then click on its "match" in the Fields in Current File listing, which is First). Repeat this manual assignment process until you have assigned every field from the Fields in Import File listing (so that it is empty), or it contains the leftover fields you have decided you do not need. Click OK when you're done.
NOTE: The data in any unassigned fields will not be imported into your current file. The imported records are added to the end of your file. If you have already sorted your list, you may want to sort again to put the records in order.
Q13 I have Windows XP, and when I try to use the Help in the program, it doesn't work. What's wrong?
A13(Answer ID 1268): Using HTML-Based Help on Windows XP with Service Pack 2
The new security settings in Service Pack 2 for Windows XP block the active content in the HTML-based help. The active content helps you navigate the help topics and allows the program to open the help topic that relates to a dialog when you click a Help button. When it is blocked, you cannot use the HTML-based help. To un-block it:
The following procedure will allow active content to run on your computer when the file with the active content is already on your computer. This doesn't affect active content on CDs or on the Internet.
Allowing Active Content on Your Computer
1) Start Internet Explorer.
2) Open the Tools menu and choose Internet Options.
3) Click the Advanced tab.
4) Scroll down to the Security settings and check the box to Allow active content to run in files on My Computer and then click OK.
*********************************
If the Help file continues to fail when you try to access it with this an error such as the following:
"Cannot find 'C:\Program Files\MyPostageRateSaver\MyMail.htm.?0' Make sure that the path or Internet address is correct."
Save this file to C:\Program Files\Common Files\MyPostageRateSaver
When asked to replace the file of the same name, click Yes.
Q14 "Could not find supporting program files to do address correction..."
A14(Answer ID 1204): When trying to check addresses in the mailing program, you may receive the following error:
Could not find supporting program files to do address correction. Please reinstall the software.
OR
Could not find supporting program files to do address correction.
Make sure your internet connection is working and connected.
If the problem persists, then uninstall MyPostageRateSaver and then re-install MyPostageRateSaver. This will reset the location that the program looks at to find the address correction data files.
Q15 I get an error referencing "Clacstmp.dll" or "Clacadv.dll" when I try to use my program
A15(Answer ID 1266): When trying to launch a program after its installation, you may get one of the following error messages:
The file clacstmp.dll does not exist or is not registered correctly.
OR
One or more files did not self-register properly: Clacstmp.dll
This error message means that some system DLL files on your computer are not up-to-date and cannot support the proper functioning of your program. However, you can resolve this problem and get your program up and running by downloading and installing two new system DLL files on your computer. After loading these new files, you should see these error messages go away and you would be able to successfully open and use your software.
Please do the following:
1) Click on the link below to download the file Clacstmp.dll
2) When prompted, choose to Save the file to your computer ("Save this file to disk").
3) Save the file to this location: C:\Program Files\Common Files\MyPostageRateSaver (If you are asked if you want to replace an already existing file, click Yes)
4) Click on the link below to download the file Clacadv.dll
5) When prompted, choose to Save the file to your computer ("Save this file to disk").
6) Save the file to this location: C:\Program Files\Common Files\MyPostageRateSaver (If you are asked if you want to replace an already existing file, click Yes)
7) Click on your Start menu and choose Run
8) In the Run command type this (you may want to copy and paste the text to make sure you get it exact):
regsvr32.exe c:\progra~1\common~1\mypost~1\clacstmp.dll 9) Click OK - you should get a message that the file was successfully registered, then click OK to close that message
10) In the Run command type this (again, being exact):
regsvr32.exe c:\progra~1\common~1\mypost~1\clacadv.dll 11) Click OK - you should get a message that this second file was successfully registered, then click OK to close that message
12) Close all open windows and attempt to open your program again - it should load successfully.